Migrating from Business Objects Crystal Reports to SQL Server 2005 Reporting Services
SQL Server 2005 Reporting Services Whitepaper
Microsoft Corporation
July 2006
Applies to:
Microsoft SQL Server 2005 Reporting Services
Summary:
This document assists Crystal Report designers with migrating to
Microsoft SQL Server 2005 Reporting Services using a step-by-step
migration strategy. (40 printed pages)
Click here
to download the Word document version of this article.
Contents
Introduction
Comparing Business Objects Crystal Reports 8.5+ to SQL Server 2005 Reporting Services
Preparing to Convert to SQL Server 2005 Reporting Services
Migrating Crystal Report Sections to SQL Server 2005 Reporting Services
Migrating Additional Crystal Report Features to SQL Server 2005 Reporting Services
Using Alternative Migration Techniques
Conclusion
Useful Links for SQL Server 2005 Reporting Services
Introduction
All
businesses need a reliable and efficient reporting solution. Some
organizations develop their own in-house solutions, while other
organizations implement solutions using products available in the
market. For many years, Business Objects Crystal Reports was the
mainstream option for business reporting solutions, as evidenced by the
bundling of Crystal Reports with other applications, including
Microsoft Visual Studio. While Crystal Reports has worked well for many
companies, with the recent release of SQL Server Reporting Services,
companies are reevaluating their purchasing decisions, and looking for
a more unified and cost-effective reporting solution.
Microsoft
SQL Server 2005 Reporting Services (SSRS) is the emerging solution of
choice for businesses requiring enterprise reporting capabilities, and
it competes directly with top-tier reporting solutions such as Crystal
Reports. Because SSRS ships with SQL Server 2005, companies can fully
leverage their investment in SQL Server and benefit from the deep
integration with the other areas of the product. Some of the latest
enhancements to Reporting Services—including an ad hoc report designer called Report Builder—bring Microsoft to the forefront of the reporting solutions market.
Because
there are so many companies using Crystal Reports today that also own
SQL Server and want to begin using SSRS as a lower-cost alternative,
there is a need to guide Crystal Reports designers with the migration
of their current Crystal Reports solution to SSRS. This document will
focus on the manual migration effort for Crystal Reports 8.5 and later,
and it includes a section-by-section comparison of report information
from Crystal Reports to that of SSRS. This approach will also introduce
Crystal Reports users to SSRS and demonstrate the similarities of the
two systems.
By studying actual migration efforts, we have
observed that a large number of migrated reports are tabular and use
features such as formulas, groupings, and parameters. While much of the
functionality in Crystal Reports is available in SSRS, the scope of
this paper is limited to the migration of the specific sections
detailed in Table 1.
Table 1. Crystal Report sections scoped for this paper, and comparable SSRS report sections
| Crystal Report Sections | SSRS Sections |
| Connection, data source, and parameters | DataSet |
| Report header and report footer | Page header and page footer |
| Page header and page footer | Page header and page footer |
| Row-level data, groupings, and subtotals | Table control |
| Formulas and custom functions | Expressions, inline code, and custom DLLs |
Please
note that the semantic layers (Universe and Business View) in more
recent versions of Crystal Reports are not considered in this document,
although SSRS does include similar functionality that insulates the
business users from the complexities of relational and online
analytical processing (OLAP) data sources. Through the Report Builder [ http://msdn2.microsoft.com/en-us/library/ms155933(sql.90).aspx ] of SSRS, end users can create ad hoc reports using predefined report models
[ http://msdn2.microsoft.com/en-us/library/ms159750(sql.90).aspx ] to
act directly against relational data sources. Additionally, SQL Server
2005 introduces a new concept, the Unified Dimensional Model
[
http://msdn.microsoft.com/library/default.asp?url=/library/en-us/dnsql90/html/introtoudm.asp
] , which, like the Business Objects Universe view, is a metadata layer
that sits on top of the physical database. Some of the key benefits of
the UDM over the Business Objects Universe view include:
- Provides a method for expressing and managing Key Performance Indicators (KPIs).
- Provides a transparent aggregate definition, management, and navigation engine.
- Provides an advanced calculation language (MDX) that is more expressive than SQL and understands multidimensional data.
- Supports parent–child/unbalanced hierarchies in addition to ragged hierarchies.
- Enables
the definitions of subsets (perspectives) of the overall semantic layer
in order to simplify presentation to the user, as opposed to relying on
multiple separate universes with copies of common classes and objects.
- Provides transparent management of query contexts, thereby removing this complexity from the design of your semantic layer.
- Enables server-side integration of data from heterogeneous systems, without extract, transform, and load (ETL) tasks.
- Translates
metadata, enabling users to view and consume metadata using their own
national language during the creation of reports.
To learn more about the SSRS Report Builder capabilities and the SQL Server 2005 UDM, visit the following Books Online topics:
- Report Builder [ http://msdn2.microsoft.com/en-us/library/ms155933(sql.90).aspx ]
- Unified Dimensional Model [ http://msdn.microsoft.com/library/default.asp?url=/library/en-us/dnsql90/html/introtoudm.asp ]
Finally,
some basic knowledge of SSRS is required when migrating Crystal Reports
to SSRS. To further assist in your reading, throughout this document
there are links to SSRS Books Online that provide additional coverage
on specific SSRS topics.
Comparing Business Objects Crystal Reports 8.5+ to SQL Server 2005 Reporting Services
Strategic Benefits of Migrating to SSRS
Making
the decision to migrate your existing Crystal Reports to SSRS requires
a thorough comparison of the two products, in order to determine which
is best for your business. In addition to just looking at features,
some key strategic questions to ask during this evaluation are:
- How well does my reporting solution integrate with the rest of my Business Intelligence (BI) technologies?
- How well does my reporting solution integrate with my databases and data sources?
- How easy will it be for my developers to learn how to build and deploy enterprise reports?
- Is the complexity of my current reporting solution preventing its deployment and use for better decision making?
- What are the maintenance and administration costs of my current reporting solution?
- What will a reporting solution cost my business?
Deep Integration with Microsoft Business Intelligence
With
the release of SQL Server 2005, Microsoft has taken extraordinary steps
to bring to market a complete enterprise Business Intelligence platform
that integrates all aspects of Business Intelligence into one
easy-to-use architecture. Not only does SQL Server 2005 include a new
performance-enhanced database engine, but it also includes Analysis
Services for building OLAP cubes and data mining; powerful Integration
Services for performing extract, transform, and load (ETL) tasks from
various data sources; and Reporting Services for Operational Reporting.
Unified and Consistent Development Model
Because
the tools included in the SQL Server Business Intelligence Development
Studio—for example, the Report Designer—leverage the Visual Studio
framework, developers benefit from a consistent development methodology
and easier learning process when developing applications that require
both Visual Studio and Reporting Services. Additionally, unlike
Reporting Services for SQL Server 2000, which required a Microsoft
Visual Studio .NET 2003 license, SQL Server 2005 includes a set of
design tools in the SQL Server Business Intelligence Development Studio
for report design, development, and deployment. SSRS also adds
additional controls, such as the ReportViewer control, to
Visual Studio 2005 and Visual Web Developer Express, so that you can
embed reports within your .NET applications or ASP.NET websites.
Inclusive Pricing and Value for the Money
Finally,
baseline Reporting Services functionality has even been added to SQL
Server 2005 Express with Advanced Services, so you can benefit from
basic local reporting, without accruing additional cost. So, if you
currently have an instance of SQL Server 2005, or are thinking about
implementing one, consider leveraging your investment by using SSRS for
your reporting needs, instead of paying potentially hundreds of
thousands of dollars for third-party reporting solution products.
Other SSRS Benefits
SSRS
has several other benefits to consider. One of the key concepts of the
product is its use of XML to describe reports, data sources, report
models, and even service configuration. The Microsoft Report Definition
Language (RDL) is an XML schema that is used to describe reports built
using Reporting Services Report Designer or Report Builder. RDL
documents promote an extensible and open report document format that
can be easily shared between applications. Another feature of SSRS is
its extensibility. By extending SSRS, application developers can create
new custom data sources, new delivery capabilities, new rendering
options, or new security. Additionally, Web Services can be used as
data sources, and custom report controls can be easily created and used
in reports. Finally, SSRS introduces Report Builder, which allows users
to build ad hoc reports from the Report Manager, and then save
those reports for future reference. For additional information about
new features and enhancements in SSRS, refer to the Microsoft SQL Server 2005 Reporting Services website [ http://www.microsoft.com/technet/prodtechnol/sql/2005/2005ssrs.mspx ] .
Crystal Reports and SSRS Compared
Table 2
provides a brief comparison of the features of Business Objects Crystal
Reports Server and Microsoft SQL Server 2005 Reporting Services.
Table 2. Comparison of Crystal Reports Server and SSRS product features
| Feature | Crystal Reports Server | SSRS |
| Report Server Features | | |
| Publishing | InfoView and Windows client | Visual Studio–based Report Designer, Web-based Report Manager (main user interface), Microsoft Windows SharePoint Services, and Report Viewer control |
| Schedule calendar | Template schedules can be used by different reports | Shared schedules can be used by different reports |
| Export formats | Word, Excel, and PDF | Excel, Text, XML, PDF, TIFF, and MHTML (or custom rendering extensions) |
| Delivery channels | MAPI, file, FTP, and e-mail | E-mail and file share (or custom delivery extensions) |
| Data-based subions | Available (through Business View semantic layer only) | Dynamic query-based subions |
| Alerts | Available | Available |
| Events | Custom, file, and scheduled | Customizable through Web Services application programming interface (API) |
| Report history | Report instances | Snapshots |
| Linked reports | Available through coding of hyperlinks only when using Crystal Reports Server or Business Objects Enterprise | Simple dialog box to create links to a shared report, with the option of customizing properties of the linked report |
| Report Types | | |
| Drill down reports | N-depth levels | N-depth levels |
| Report with subreport | Only one level of subreports | N-depth levels |
| Cross-tab reports | Available | Available |
| OLAP reports | Available | Available |
| Multi-column reports | In details and groups | In details and groups |
| Labels | Standard or user-defined | User-defined |
| Report Object Features | | |
| Maps | MapInfo (ActiveX control) | Available |
| Formulas | Crystal or Basic syntax; formulas can be reused in server repository. | Visual Basic .NET expressions or embedded .NET assembly objects |
| SQL expressions | Sentences processed by SQL engine (formulas processed by Crystal engine) | Not needed, because there is direct interface to SQL database native dialect |
| Parameters | Dynamic parameters available (only when Business View or Universe is used) | Dynamic parameters available |
| Cascading parameters | Available only in Business Views | Available; can define values for one parameter, based on another parameter's value. |
| Pictures, lines, and figures | Not possible to apply conditional formatting | Fully customizable |
| Custom and user-defined functions | Functions from a report can be exported to global repository | Use .NET assemblies |
| Data region | Must use several detail sections, subreports, and user functions | Database field brings back first record for display; data region controls display of multiple records. |
| Shared data sources | Business view functionality | Can be shared by multiple reports |
| Multiple data regions on a report (tables, matrices, charts, and so on) | Not available | Available |
| Grouping and Sorting Features | | |
| Top-N, bottom-N, top %, bottom % | Available; includes wizards | Available |
| Export | Exports through viewers | Exports through viewer or subion services using rendering extensions |
| Viewer Features | | |
| Formats | Native Crystal, Excel, PDF, RTF, and Word | HTML 3.2/4.0, PDF, Excel, XML, CSV, TIFF, and MHTML |
| Navigation in parts | Can be defined | Uses bookmarks on report objects |
| Group navigation | Available as group tree | Available as document map |
| Drill-down on same page | Not available | Available |
Preparing to Convert to SQL Server 2005 Reporting Services
Analyze Your Current Reporting Solution
Once
you have made the decision to migrate your existing Crystal Reports to
SSRS, the first step will be to determine how your current reporting
solution will be duplicated in a Reporting Services solution. To start,
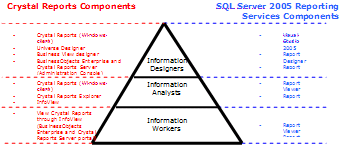
consider the users of your reporting solution. As shown in
Figure 1, there are generally three types of users in an
organization that interact with reporting: information designers,
information analysts, and information workers.
 [ http://msdn2.microsoft.com/en-us/library/aa964127.migrb01l(en-us,sql.90).gif ]
Figure 1. Reporting user types (Click on the image for a larger picture)
- Information designers—Activities
include designing and deploying reports, creating report
models/semantic layers, and administering the overall reporting
solution.
- Information analysts—Activities include viewing and analyzing reports distributed by the information designers, and creating additional reports.
- Information workers—Activities
include using the data in the reports provided by the information
designers and information analysts to make business decisions.
Note Delivery
channels such as Microsoft Office and e-mail are not listed above but
are supported by both product sets.
After
determining how the different user types will interact with SSRS, you
next need to study the reports in the current Crystal Reports solution.
Develop a list of all reports, and capture important information
relevant to each report—for example:
- Is the report still being used by the organization?
- What users and groups use the report?
- How frequently is the report accessed?
- How is the report accessed?
- Is the report used in other reports?
- What is the data source?
- Are there different products to access different data sources (Crystal Reports, Web Intelligence, and OLAP Intelligence)?
- What information is being displayed?
- What business decisions are being made based on the report?
By
organizing and capturing important information about your report
consumers, you will better understand their common characteristics.
With this list prepared, you can begin defining your SSRS solution.
Identify Consolidation and Standardization Opportunities
More
often than not, the implementation of a new reporting solution provides
an opportunity to consolidate many reports that have been created over
the years. By significantly reducing the number of reports, support for
these reports is simplified, while data visibility and organization are
improved. For example, you can consolidate reports that duplicate
information or that no longer serve a purpose. Your analysis of your
current reporting solution should help you discover consolidation
opportunities.
Additionally, you should use this time to
consider ways to better standardize reports. To start, consider
implementing stored procedures to replace SQL statements in your
reports. By using stored procedures, you can protect your reports from
malicious attacks—for example SQL Injection—and potentially improve the
performance of your queries.
Plan Your Migration
When
you have completed analyzing your current Crystal Reports reporting
solution and identified any consolidation and standardizing
opportunities, the next step is to plan the migration details of
Crystal Reports to SSRS. This planning will use your analysis results
to identify which report types and users to migrate to SSRS first.
Generally, a phased migration is the best approach for the end users as
well as the design team. Each phase should have a formal communication
process that is shared with all end users. At a minimum, communicate
the date of the migration, any possible downtime to the users, and a
support contact for any issues the users may encounter after the
migration. Once all phases have been defined, a target date can be set
for the retirement of the Crystal Reports Servers.
Additionally,
you may want to budget some time for training your end users on the
Report Manager and Report Builder. During this training, you can
solicit user feedback on the new system, as well as define new report
models for the Report Builder ad hoc queries.
Migrating Crystal Report Sections to SQL Server 2005 Reporting Services
Now
that you have completed analysis of your reporting solution and have a
list of reports to convert, you're ready to perform a
section-by-section migration process for each report. To begin, let's
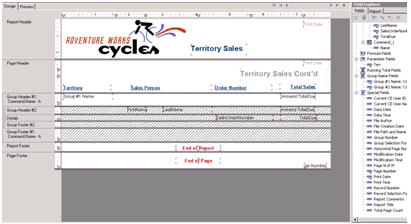
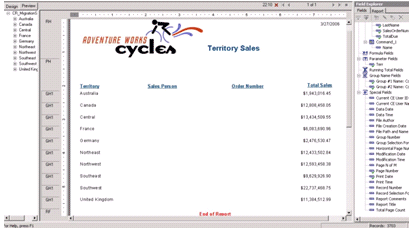
take a look at a typical Crystal Report (Figures 2 and 3). In this
report, sales data is reported for each territory. Grouping is
performed first by territory, and then by salesperson.
 [ http://msdn2.microsoft.com/en-us/library/aa964127.migrb02l(en-us,sql.90).gif ]
Figure 2. Sample Crystal report design interface (Click on the image for a larger picture)
 [ http://msdn2.microsoft.com/en-us/library/aa964127.migrb03l(en-us,sql.90).gif ]
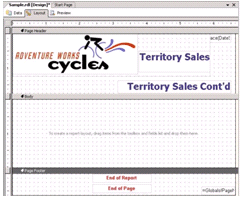
Figure 3. Crystal report sample preview (Click on the image for a larger picture)
This
Crystal Report connects to the AdventureWorks database and reports on
Territory Sales. Two commands are used to return data for the report, Command and Command_1. Command returns the sales data for each employee in each region. Command_1 returns a distinct list of all territories. There is also one parameter defined, Terr,
that represents the different territories available for selection when
viewing the report. Finally, formulas are used to toggle visibility of
the Page Header textbox for the text "Territory Sales Cont'd."
If the page number is 1, the textbox is suppressed; otherwise, the
textbox is displayed.
Next, let's review the steps required to migrate the report in Figures 2 and 3 to SSRS:
- Create a new Report Server Project in SQL Server Business Intelligence Studio.
- On the Data tab, create a new dataset and configure the data source connection information.
- Create the query information in the dataset to retrieve the necessary fields for the report.
- Create any parameters to the dataset query, and test the query.
- On the Layout tab, create the report headers and report footers.
- Create the page headers and page footers.
- Establish row-level data, groupings, and subtotals.
- Create formulas and custom functions.
- Create additional features such as matrices, charts, multiple data sources, subreports, and linked reports.
To get started, open SQL Server Business Intelligence Development Studio and create a new Report Server Project
[ http://msdn2.microsoft.com/en-us/library/ms167559(sql.90).aspx ] .
When the project is created, you will see a standard report template
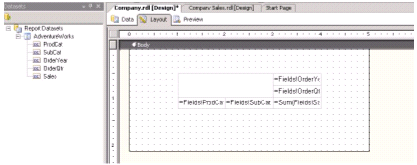
similar to Figure 4. A report template includes three tabs: Data, Layout, and Preview:
- The Data tab allows you to configure datasets for a report. A report may have multiple datasets, from multiple heterogeneous sources.
- The Layout tab is where you design the report.
- The Preview tab allows you to preview your report with actual data from the report dataset(s).
 [ http://msdn2.microsoft.com/en-us/library/aa964127.migrb04l(en-us,sql.90).gif ]
Figure 4. Visual Studio .NET 2005 standard report template (Click on the image for a larger picture)
Connection, Data Source, and Parameters
The
first task required to migrate a report is to set up the connection
information to the data source. From the Crystal Report migration
sample in Figure 5a, the data source will be SQL Server. In SSRS,
this connection information is called a data source. A dataset
contains a reference to a data source, as well as query information.
You can add a data source as a separate step, or as part of adding a
new dataset. To set up a new dataset for your report, on the Data tab of the report, click the DataSet drop-down list, and then click New DataSet.
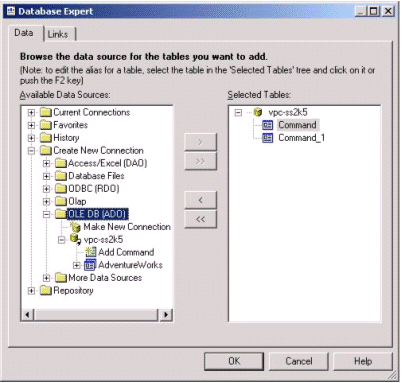
Figure 5a. OLE DB connection to the SQL Server AdventureWorks database
The Data Source dialog box appears (Figure 5b). Type a name for your data source, and then select the type.

Figure 5b. Data Source dialog box for a dataSet
Next, click Edit to define the connection properties for the data source (Figure 6).
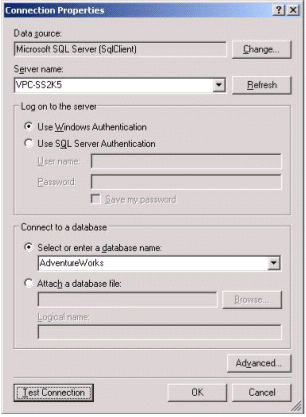
Figure 6. Connection Properties dialog box for a data source
After specifying the connection properties and testing the connection, click OK to return to the Data Source dialog box. Click OK again to save the data source information and return to the Data
tab of the report. You should notice the TerritorySales dataset now
available in the Datasets window. So what just occurred? Essentially,
we've just created a container for the results of our query to be
stored once a report is run. The dataset acts as an in-memory
representation for the results of the query. To learn more about
datasets and data sources in SSRS, visit the Working with Data in Reporting Services [ http://msdn2.microsoft.com/en-us/library/ms160324(sql.90).aspx ] topic in Books Online.
The
next step is to generate a query to return a list of fields from this
data source, to populate the dataset created for use in the report.
Since the data source for the sample Crystal Report is the
AdventureWorks database on a SQL Server, we can paste the SQL query
from the sample Crystal Report directly into the query pane of the Data tab (Figures 7a and 7b).
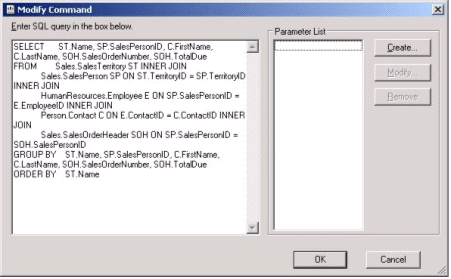
Figure 7a. Command query from the sample Crystal Report
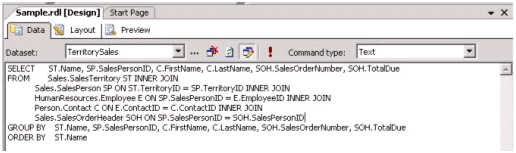
Figure 7b. Command query from the sample Crystal Report pasted into the data query for the SSRS report
You could alternatively call a stored procedure here as well, by changing the value in the Command Type drop-down list. For more information, visit the Defining Datasets for a SQL Server Relational Database [ http://msdn2.microsoft.com/en-us/library/ms159260(sql.90).aspx ] topic in Books Online.
You
also need to create one more dataset that lists all the available
territories in the AdventureWorks database. This dataset will be used
as a parameter source in the next section. Repeat the previous steps to
create another dataset using the AdventureWorks data source, and name
the dataset Territories. Use the same query from Command_1 in the Crystal Report sample.
Select distinct(Name) from Sales.SalesTerritory
Finally, the sample Crystal Report includes one parameter, terr, to allow users to select the territories to view when the report is run (Figure 8a).
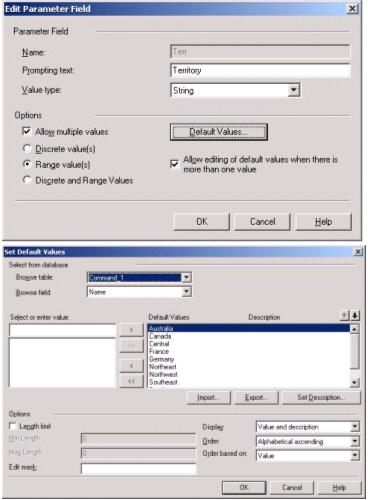
Figure 8a. Sample Crystal Report parameter and parameter defaults from Command_1
In SSRS, the data query can be easily updated to include a where
clause to automatically configure the report to display optional
parameters. In Figure 8b, the data query has been updated to include
the following where clause.
where st.name IN (@terr)
This statement will return all the territories from the data source whose name is in a territory list submitted by the user.

Figure 8b. Dataset query updated to use a parameter
An
SSRS report also contains a Report Parameters properties page where the
designer can view all the parameters of the data query in one place. To
access the Report Parameters page, click the Report menu, and then click Report Parameters.
Upon opening the Report Parameters page, the terr
parameter is automatically detected by SSRS and added to the parameters
list. The basic properties of a parameter include its name, data type,
and prompt. You can additionally select the value modes (allow nulls,
multi-valued, and so on), available values to display for the
parameter, as well as a default value(s) to use when the report first
executes.
To configure the additional parameter information from the query in Figure 8b, configure the prompt for the terr parameter to Territories. Next, set the value mode to Multi-value and Allow blank value.
When setting the available values, designers can input static
non-queried values or use a dataset. For this sample report migration,
use the Territories dataset to populate the parameter list. Use the
Territories Name field as both the Value and Label
fields. Because the parameter is a multi-value parameter, users will be
able to select one, two, or all territories to view at once. Finally,
the Default values section also allows for static, queried, or null values to be defined. Select the From Query option, and once again use the Territories dataset, with the Name field of the dataset as the Value field. Once complete, the terr parameter should look something like Figure 9.
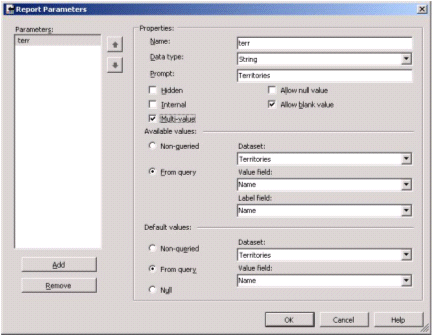
Figure 9. Report Parameters properties page
Once all parameters have been entered for the report, click OK to return to the Data
tab. Now that you have a report parameter, you can update the query to
use it. When adding a parameter to a query or stored procedure, you
precede the parameter name with the @ symbol, just like any
other SQL variable. This query parameter serves as a placeholder, to be
replaced at execution time with the parameter value selected in the
report.
For more information about report parameters, visit the Using Parameters in a Report [ http://msdn2.microsoft.com/en-us/library/ms155917(sql.90).aspx ] topic in Books Online for SSRS.
Finally,
to test the dataset, you can run the query and view the result set by
clicking the red exclamation mark above the query pane. The results
will be displayed below the query pane.
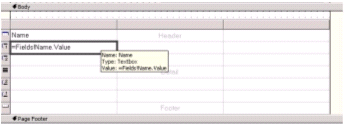
Report Header and Report Footer
The report header and report footer
are generally sections that are displayed on the first page and last
page, respectively, of the report. However, unlike Crystal Reports,
SSRS does not have explicit Report Header and Report Footer sections. Instead, you can use the Page Header and Page Footer sections.
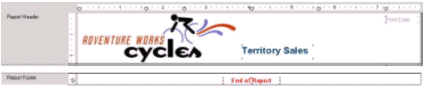
Let's examine the Report Header and Report Footer sections from the sample Crystal Report in Figure 3 (Figure 10a).
 [ http://msdn2.microsoft.com/en-us/library/aa964127.migrb10al(en-us,sql.90).gif ]
Figure 10a. Report Header and Report Footer sections from the sample Crystal Report (Click on the image for a larger picture)
In Figure 10a, the report header of the sample Crystal Report contains an image, a textbox object with the report title, and a date stamp to show when the report was created. The report footer contains a simple textbox object indicating the end of the report.
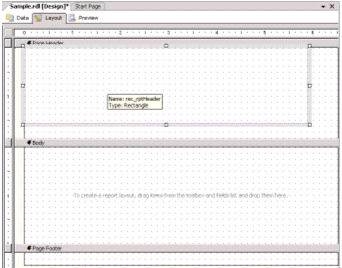
To migrate these sections to SSRS, click the Layout tab of the report template to view the report layout. To add a page header to the report, click the Report menu, and then click Page Header.
This section is now available for use in the report layout form. Next,
you'll use a rectangle as a container for an image and a textbox that
comprise the report header. Drag a Rectangle control from the
Toolbox window, and drop it in the page header. At this point you
should notice the similarities between SSRS and Crystal Report's
WYSIWYG report design as well as pixel perfect report creation (that
is, controls can be easily dragged and dropped onto the design surface
and positioned to the pixel location of choice with great flexibility).
 [ http://msdn2.microsoft.com/en-us/library/aa964127.migrb10bl(en-us,sql.90).gif ]
Figure 10b. Typical report design with Page Header and Page Footer sections added (Click on the image for a larger picture)
Next, add Image and Textbox controls to the rectangle, and adjust the size of the rectangle as needed (Figure 11).
 [ http://msdn2.microsoft.com/en-us/library/aa964127.migrb11l(en-us,sql.90).gif ]
Figure 11. Page Header Rectangle control updated with Image and Textbox controls (Click on the image for a larger picture)
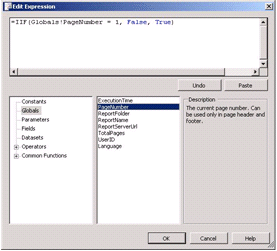
Because these controls should be displayed only on the first page of the report, you need to change the Visibility property of the Rectangle control. Right-click the Rectangle control, and then click Properties. In the Properties window, locate and expand Visibility. Click the list box for the Hidden property to select Expression. An expression
is very similar to a formula in Crystal Reports, but it uses Visual
Basic .NET syntax. By using an expression, a designer can
programmatically define a value for a property. To toggle the
visibility of the Rectangle control, you can create an expression using a global variable—PageNumber (Figure 12). For more information about expressions, see Working with Expressions in Reporting Services [ http://msdn2.microsoft.com/en-us/library/ms345242(sql.90).aspx ] .
 [ http://msdn2.microsoft.com/en-us/library/aa964127.migrb12l(en-us,sql.90).gif ]
Figure
12. Using the Expression Editor to show\hide the Rectangle control
based on page number (Click on the image for a larger picture)
Click OK to close the Edit Expression
dialog box. You have now completed your report header. By grouping
information in a rectangle, you are able to show or hide the rectangle
contents based on the current report page. You can use this same method
for the report footer as well. Follow the same steps that you just
completed, but place the controls in the page footer. Change the
expression for the page footer's rectangle to the following.
=IIF(Globals!PageNumber = Globals!TotalPages,False, True)
Page Header and Page Footer
The
page header and page footer are generally sections that are displayed
near the top and bottom, respectively, of every page in a report. As
you learned in the previous section, to include page headers or page
footers in a report, click the Report menu, and then click Page Header or Page Footer.
Let's examine the page header and page footer from the sample Crystal Report (Figure 13).
 [ http://msdn2.microsoft.com/en-us/library/aa964127.migrb13l(en-us,sql.90).gif ]
Figure 13. Page Header and Page Footer sections from the sample Crystal Report (Click on the image for a larger picture)
Here,
the page header displays the column or field headings of the report, as
well as a textbox that is conditionally suppressed. When the current
page is Page 1, the textbox is suppressed, but when the current page is
not Page 1, the textbox is not suppressed. SSRS includes the column headings in the table
control, as explained in the next section. For now, you can migrate the
date stamp, and the textbox that contains the "Territory Sales Cont'd"
text, to the page header in SSRS, since these controls are static text.
Since the date stamp is displayed in the top-right corner of every
page, you can use the page header to display this information. Drag a
textbox onto the page header, and position it in the top-right corner.
With the textbox selected, find the Value property in the Properties window, and then select the Expression option in the drop-down list to build the following expression.
=Replace(DateString(),"-","/")
This
expression simply reformats the date string to look like the Crystal
Reports date string. Rather than type a function, you can select any
function from a list in the Expression Editor. Here, functions are
organized by type in the Custom Functions list. The Replace function is in the Text group whereas the DateString function is located in the Date & Time group. Alternatively, you can use the format property of the textbox to set the date format (dd/MM/yyyy) and set the value for the textbox to =Now for this particular example.
Next, drag and drop another textbox into the page header, and type Territory Sales Cont'd in the textbox. Since this title should be displayed on all pages except the first page, use the Visibility property of the textbox to build an expression that conditionally shows or hides this control.
To migrate the page footer, drag and drop a textbox control to the Page Footer section. Then, set the Visibility expression to display the page footer information on all pages except the first page (Figure 14).
 [ http://msdn2.microsoft.com/en-us/library/aa964127.migrb14l(en-us,sql.90).gif ]
Figure 14. Updated page header and page footer information in SSRS (Click on the image for a larger picture)
To learn more about report layout in SSRS, visit the Understanding Report Layout and Rendering [ http://msdn2.microsoft.com/en-us/library/ms157348(sql.90).aspx ] topic in Books Online for SSRS.
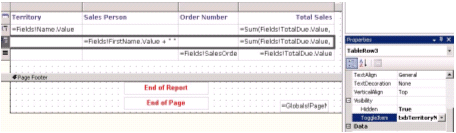
Row-Level Data, Groupings, and Subtotals
At
the heart of most reports is the row-level data returned from the data
source. Row-level data is often grouped by common fields. A report may
also include subtotals for each group. Let's examine the available
row-level data, groupings, and subtotals from the sample report that we
are migrating (Figure 15).
 [ http://msdn2.microsoft.com/en-us/library/aa964127.migrb15l(en-us,sql.90).gif ]
Figure 15. Report details, groupings, and subtotals from the sample Crystal Report (Click on the image for a larger picture)
In
Figure 15, there are two groups for the row level: Territory and
Last Name. In this example, the data is also displayed in a tabular
format for easy drilldown into each group. Finally, the report shows
summary data (subtotals) of the total sales by territory and by
salesperson.
As mentioned in the previous section, SSRS provides a table control to display the column headings in a tabular report.
Table 3 lists the controls—known as data regions in SSRS—that you can use in a report, and the corresponding Crystal Reports controls (if available).
Table 3. Comparing Crystal Reports and SSRS controls
| Crystal Reports Control | SSRS Control | SSRS Deion |
| Text object, label, and field | Textbox | Displays
all text data in a report. A table or matrix cell is, in fact, a
textbox. You can place a textbox anywhere on a report to display
labels, fields, or calculated data. |
| Line | Line | A
line is a graphical element that you can place anywhere on a page. You
define a line with a start point and an end point, and specify styles
such as weight or color. Data is not associated with a line. |
| N/A | Table | Using
a table data region, you arrange data into columns and rows. Tables
have a fixed number of columns, but a variable number of rows based on
the data in the dataset. There is no limit to the number of columns
that you can add to a table. You can change the design of a table cell
to span multiple columns. You can also add grouping and sorting to
arrange data within the table structure. |
| Crosstab | Matrix | Using
a matrix data region, you arrange data into columns and rows, in a
structure similar to a crosstab or pivot table. Unlike a table, which
has a static set of columns, the number of matrix columns can vary. |
| Box | Rectangle | Use
rectangles as a graphical element or as a container for other report
items. When you place report items within a rectangle, you can move
them with the rectangle, which is useful for keeping numerous textboxes
and other items together in a report. |
| Group section | List | Repeats
the controls that it contains for each group in the dataset. You can
use a list for free-form reports, or in combination with other data
regions. You can also nest a list within another list to provide
multiple groupings of data. |
| Picture | Image | An
image displays binary image data in a report. You can use a URL to
display an image stored on a Web server, embed image data in a report,
or display an image from a database. SSRS supports BMP, JPEG, GIF, and
PNG files. |
| Subreport | Subreport | A subreport
is an item in a report that points to another report on the report
server, which may be a full report that could be run independently, or
a report created solely for embedding in a main report. When you define
a subreport, you can also define parameters to filter data in the
subreport. |
| Chart | Chart | A chart
is a data region that displays data graphically in a report. You can
choose from many different types of charts. You can also change the
style of the chart to include different colors, symbols, and 3D effects. |
To reproduce the details, groupings, and subtotals of the sample Crystal Report in Figure 15, drag and drop the table
control from the Toolbox into the body of the report. By default, a new
table contains header, detail, and footer information. Additional
information about the table control is shown in Figure 16. In particular, notice that the table header in the table control displays column headings, unlike Crystal Reports, which use the page header.
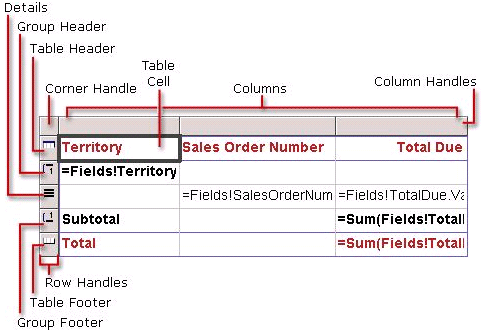
Figure 16. SSRS table control overview
First, assign a dataset to the table
control. Click the table, and then click the corner handle to display
the properties of the table in the Properties window. Locate the DataSetName property, and assign the applicable dataset.
Next,
configure groupings for the table. Click the table to display the row
and column handles. Right-click one of the row handles, and then click Insert Group to display the Grouping and Sorting Options dialog box. The General
tab in this dialog box allows you to specify the fields used to group
the dataset. First, give the grouping a name. Next, select an
expression for Group On. Since the first grouping is based on the territory name, select the Name field from the dataset. Keep the default values for everything else, and then click OK to return to the table. Your table now includes a new grouping, as shown in Figure 17.
 [ http://msdn2.microsoft.com/en-us/library/aa964127.migrb17l(en-us,sql.90).gif ]
Figure 17. Adding a grouping to a table control (Click on the image for a larger picture)
Next, add a second grouping for salesperson. Repeat the previous steps to add a second group to the table, based on SalesPersonID. Your table should now look similar to the one shown in Figure 18.
 [ http://msdn2.microsoft.com/en-us/library/aa964127.migrb18l(en-us,sql.90).gif ]
Figure 18. Adding a second grouping to a table control (Click on the image for a larger picture)
Now
that your table includes groupings, you can start placing data into the
table. Just drag and drop fields from the Datasets window onto the
table. To continue with the sample Crystal Report, drag and drop the Name
field into the first cell of the grouping header. Once the field is
added to the grouping header, the table header is also updated with the
field title. Alternatively, you can manually edit table headers, just
as you can in Crystal Reports. Also, notice the expression used in the
first grouping header to refer to the value of the dataset field in
Figure 19.
 [ http://msdn2.microsoft.com/en-us/library/aa964127.migrb19l(en-us,sql.90).gif ]
Figure 19. Inserting dataset fields on a table (Click on the image for a larger picture)
Now you're ready to add SalesPersonID
to the second cell of the second grouping row, which will stagger the
display of data. Because the second grouping should display the
salesperson's first and last names, you need to create an expression to
concatenate fields in the dataset. Select the textbox, and then find
the Value property in the Properties window. Select <Expression> in the property's drop-down list (or right-click the textbox, and then click Expression), and then build an expression like the following (Figure 20).
=Fields!FirstName.Value + " " + Fields!LastName.Value
 [ http://msdn2.microsoft.com/en-us/library/aa964127.migrb20l(en-us,sql.90).gif ]
Figure 20. Textbox value created using an expression (Click on the image for a larger picture)
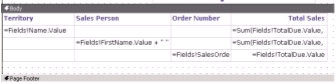
The
table in SSRS now contains all grouping information. The next level of
detail in the sample Crystal Report displays the Sales Order number and
the total due for the order. Before adding more fields to the table,
add another column. Right-click the last column in the table, and then
click Insert Column to the Right. Adjust the column widths to make sure that the table fits on the page. Then, drag and drop the SalesOrderNumber and TotalDue fields to the third and fourth columns, respectively, of the detail row. The table should now look similar to Figure 21.
 [ http://msdn2.microsoft.com/en-us/library/aa964127.migrb21l(en-us,sql.90).gif ]
Figure 21. Inserting fields in the table detail row (Click on the image for a larger picture)
Again,
notice that the table header automatically includes the field name. Be
sure to change the column headings to match the headings in the Crystal
Report. You can apply formatting by using the Report Formatting toolbar, or by changing properties in the Properties window.
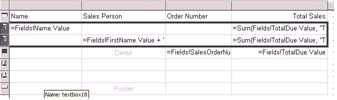
Now
you're ready to add subtotals by salesperson and by territory. The
first grouping header for total sales will display the subtotal for
each territory. To calculate this subtotal, drag TotalDue into the fourth column of the first grouping header. SSRS automatically adds the Sum
aggregate function to fields with a numeric data type. Repeat this step
to add a subtotal by salesperson to the second grouping header under
the Total Sales column. At this point, your table should look similar
to Figure 22.
 [ http://msdn2.microsoft.com/en-us/library/aa964127.migrb22l(en-us,sql.90).gif ]
Figure 22. Calculating group subtotals (Click on the image for a larger picture)
The
final step in this section is to enhance the table by removing unused
rows and applying formatting. When you added groups to the table, group
footer rows were automatically created. Since these rows aren't used in
this example, you can click the table, right-click the row handle of
the row to delete, and then click Delete Rows. Repeat this
procedure to delete the remaining group footer row, as well as the
table footer row. Figure 23 shows what the table control from
Figure 22 looks like when formatted.
 [ http://msdn2.microsoft.com/en-us/library/aa964127.migrb23l(en-us,sql.90).gif ]
Figure 23. Formatting the report (Click on the image for a larger picture)
In
the sample Crystal Report preview shown in Figure 3, the report
hides the secondary grouping and the details of the report until a user
clicks a territory or salesperson. To migrate this interactivity, you
can add an interactive feature [ http://msdn2.microsoft.com/en-us/library/ms159701(sql.90).aspx ] , such as Hiding Report Items, to rows of a table control. Using the Visibility
property for the table detail row and the second grouping row, you can
show or hide these rows when you click a textbox in another row. To
select the entire second grouping row, click the table, and then click
the corresponding row handle. The second grouping row is now
highlighted, and properties for the row are accessible in the
Properties window. Locate the Visibility property and change the Hidden property to True. Next, change the ToggleItem property to the name of the textbox that contains the grouping field for Territory. The ToggleItem property changes the value of the Hidden property from True to False when you click the specified textbox. Figure 24 shows the second grouping row selected and the ToggleItem property being set to txbTerritoryName, which is the name\ID of the textbox in the first grouping row.
 [ http://msdn2.microsoft.com/en-us/library/aa964127.migrb24l(en-us,sql.90).gif ]
Figure 24. Use the ToggleItem property to add report drilldown capabilities (Click on the image for a larger picture)
Repeat the previous steps to set the ToggleItem property for the table detail row. In this case, the ToggleItem property value is the textbox containing the second grouping for salesperson.
Finally, set the format of the Sales Total column to Currency. To do this, select the Sales Total column handle to highlight the entire column, and then set the Format property for the column to C. Click the Preview tab to see how the report looks now (Figure 25).
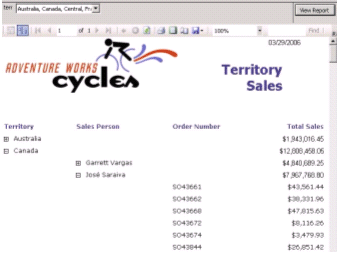 [ http://msdn2.microsoft.com/en-us/library/aa964127.migrb25l(en-us,sql.90).gif ]
Figure 25. Migration report preview (Click on the image for a larger picture)
Formulas and Custom Functions
In
reporting, more often than not, the database fields do not always
provide the data required for particular parts of a report, and
reporting solutions need alternative ways to generate data. Crystal
Reports uses formulas and custom functions to do such data generation.
A formula on a report uses expressions (Formula Workshop) to populate
report items like textbox objects. A few examples of formulas
include creating calculated fields to add to a report, formatting text
on a report, and using a custom function. Custom functions are
more complex procedures that you create in Crystal Reports to evaluate,
make calculations on, or transform data in a report. Unlike formulas,
where the scope of the formula is local to the report, custom functions
can be saved, in order to be used across multiple reports.
In
SSRS, we've been introduced to the Expression Editor to perform
calculations or to manipulate strings of an SSRS control. This feature
is very comparable to the Formula Workshop in Crystal Reports, but its
scope is only to the control where the expression is defined. To create
a more global report expression, SSRS allows designers to write custom
Visual Basic .NET functions that are accessible by the Expression
Editor of the report. Custom functions are added through the Report
Properties, which you access by selecting Report Properties from the Reports menu. Here, you can set various properties for the entire report. In this section, we'll focus on the Code and References tabs of the Report Properties dialog box.
To create functions that are easily referenced within the current report, you can use the Code
tab to create Visual Basic .NET functions. You can add multiple
functions here. Currently, Visual Basic .NET is the only language
supported. For demonstration purposes, add a simple Visual Basic .NET
function to the code that sets the foreground color of the Territory
Total Sales to red if the amount is greater than $10 million, as shown
in Figure 26.

Figure 26. Visual Basic .NET code to set the foreground color based on total sales
To
use this new function, select the textbox containing the Total Sales
for the Territory (the first grouping), and then add the following
expression to the Color property:
=Code.setColor(Sum(Fields!TotalDue.Value))
Notice the Code
keyword in the expression. This works like a namespace in SSRS, to tell
the Expression Editor where the function is located. Preview the report
to confirm that territories having total sales greater than $10 million
are displayed in a red font (Figure 27). This report design
technique can focus attention on certain results in a report. Using the
Code tab of the Report Properties dialog box and the expression builder, designers can quickly and easily add more functionality to reports.
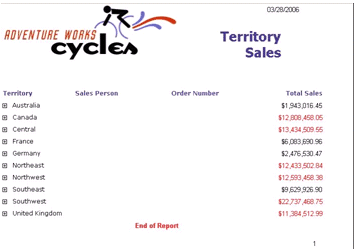 [ http://msdn2.microsoft.com/en-us/library/aa964127.migrb27l(en-us,sql.90).gif ]
Figure
27. Preview Visual Basic .NET code changing the foreground color of the
Territory Sales subtotal (Click on the image for a larger picture)
It is important to reiterate that when migrating formulas or custom code from a Crystal Report into the Code tab of the Report Properties dialog box, the formulas and custom code must be converted to a Visual Basic .NET function.
In SSRS, to create custom reusable code like custom functions in Crystal Reports, the Reference tab of the Report Properties dialog box is used. The Reference tab allows designers to reference an assembly for the report. An assembly
is precompiled code that can be shared among applications. Assemblies
are a great way to keep a library of common methods together in one
place. For instance, the sample report displays territory sales for the
AdventureWorks company. If a project requires multiple reports related
to sales and financial information, you could easily write an assembly
to define commonly used functions. You could then reference this
assembly in all reports in your project. Additionally, if any changes
are required, all changes made to the assembly propagate to all
reports. Furthermore, because it is a .NET assembly, you can use the
assembly in any .NET application. Finally, you can circumvent the
limitation that report code must be written in Visual Basic .NET by
using an assembly, which can be written in any .NET language that you
prefer (however, you must have a Visual Studio license to build custom
.NET assemblies).
To demonstrate how to use a custom assembly in
a report, you can recreate the embedded code example used in
Figure 26. Using Visual Studio .NET, construct a class library
file using C# .NET rather than Visual Basic .NET (Figure 28).
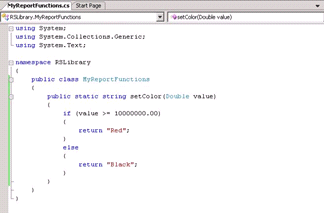 [ http://msdn2.microsoft.com/en-us/library/aa964127.migrb28l(en-us,sql.90).gif ]
Figure 28. Custom assembly to return a color string based on the input value (Click on the image for a larger picture)
Once
you compile the class library file as an assembly, copy the assembly to
the application folders for Report Server and Report Designer. The
default location of the bin folder for the report server is C:\Program
Files\Microsoft SQL Server\MSSQL.3\Reporting Services\ReportServer\bin.
The default location of the Report Designer is C:\Program
Files\Microsoft Visual Studio 8\Common7\IDE\PrivateAssemblies. For more
information about deploying a custom assembly to a report, see
Reporting Services Online Help.
Next, you reference this assembly by using the Reference tab in the Report Properties dialog box. In the Reference section, click the ... (ellipsis) button, and browse to the assembly in the Report Designer application folder. Select the assembly and click Add. Finally, click OK to return to the Report Properties dialog box (Figure 29). Because the setColor function in the assembly is a static method, you don't need to populate the class information for the assembly.
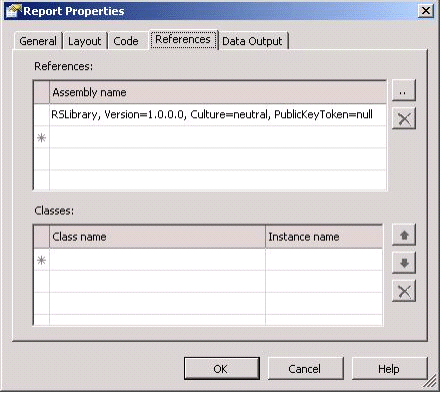
Figure 29. Referencing the custom assembly in the Report Properties dialog box
Click OK to close the Report Properties dialog box. Now, you can update the expression for the Total Sales by Territory
textbox color to use this custom assembly. To do so, modify the
expression to call the static method in the assembly, as follows.
=RSLibrary.MyReportFunctions.setColor(Sum(Fields!TotalDue.Value))
Preview the report to see that territories with total sales greater than $10 million are once again displayed in a red font.
Migrating Additional Crystal Report Features to SQL Server 2005 Reporting Services
Matrix Reports
In a matrix report,
you arrange data into columns and rows, much like a crosstab or pivot
table. By contrast to a table, which has a static set of columns, the
number of matrix columns can be dynamic. Like Crystal Reports, SSRS
includes a matrix control (or crosstab control) to generate this type of report. However, unlike the Crystal Reports matrix control, SSRS allows for fold/unfold or toggle behavior in its matrix
control. In addition, an SSRS report can also include a mixture of
matrices and other data regions, such as tables and charts, on a single
report. This gives designers much more flexibility in design.
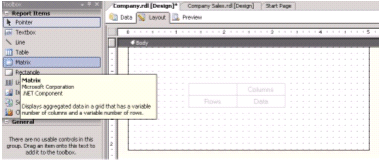
Additional information about the SSRS matrix control is shown in
Figure 30.
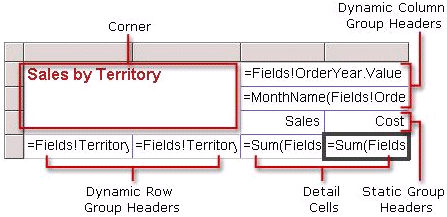
Figure 30. Matrix control overview
To
create a matrix report, create a new report in SQL Server Business
Intelligence Studio, create a dataset for the report, and then drag and
drop a Matrix control onto the Report Layout (Figure 31).
 [ http://msdn2.microsoft.com/en-us/library/aa964127.migrb31l(en-us,sql.90).gif ]
Figure 31. Empty matrix view (Click on the image for a larger picture)
In
Figure 31, notice that the control has labels for the Rows,
Columns, and Data regions. The first task of migrating a Crystal
Reports matrix report is to create a new dataset in the SSRS report,
using the data source and query information from the Crystal Report.
Using the new dataset, you can drag and drop fields onto the SSRS
matrix. The dataset for this sample matrix report, shown in
Figure 32, connects to the AdventureWorks data source, and returns
company sales information for each department during the years 2002 and
2003.
 [ http://msdn2.microsoft.com/en-us/library/aa964127.migrb32l(en-us,sql.90).gif ]
Figure 32. Matrix with grouped dataset fields (Click on the image for a larger picture)
After placing fields from the dataset onto the matrix, the matrix can now be formatted. Like the table
control in SSRS, the columns and rows of a matrix can be hidden or
displayed based on user interaction with the report, but the process to
add this functionality is slightly different. In the following example,
you'll toggle the visibility of the subcategory and the order quarter
information when the user clicks the Category and Order Yearly textboxes, respectively. To do this, click the matrix, right-click the corner handle, and then click Properties. Next, click the Groups tab to see the grouping defined for the matrix (Figure 33).
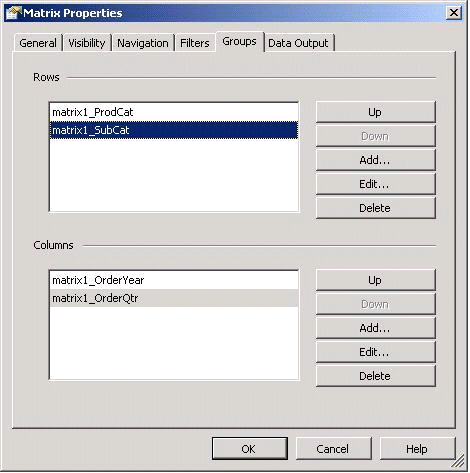
Figure 33. Editing the matrix groups
Click the <matrix name>_SubCat group, and then click Edit to view the Grouping and Sorting dialog box for this group. Click the Visibility
tab to set the initial visibility of the group, as well as to specify
the report item that toggles the visibility (Figure 34).
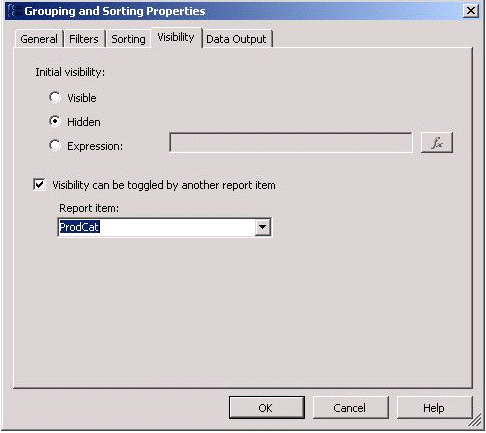
Figure 34. Editing the visibility of the Matrix1_SubCat group
Before you click OK to save the changes, click the Sorting tab. Here, you can add sorting to the group, based on any fields in the dataset. After defining the sort order, click OK to return to the Matrix Properties
dialog box. Repeat these steps to set the visibility and the sorting
for Order Quarterly group. Finally, set the sorting for the remaining
groups in the matrix: Product Category and Order Year. Click OK when finished.
Finally, add any desired formatting to the matrix in order to enhance its appearance (Figure 35).

Figure 35. Preview of the matrix report with visibility, sorting, and formatting updates
For more information about the Matrix Data Region in SSRS, please visit the Working with Matrix Data Region [ http://msdn2.microsoft.com/en-us/library/ms157334(sql.90).aspx ] topic in Books Online.
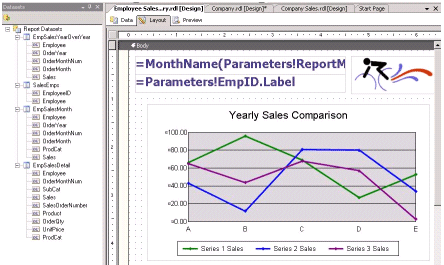
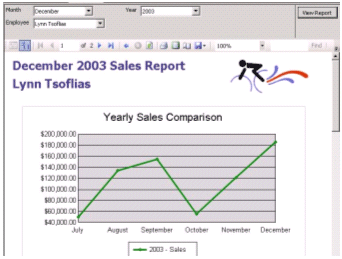
Charts
A
chart is a great way to visually display data in a way that captures
immediate attention. When migrating charts from Crystal Reports, use
the existing data source, query, and parameters from the Crystal
Reports chart definition to create a new dataset in SSRS. Once the
dataset is created, click the Layout tab, and drag and drop a chart control into the body of the report (Figure 36). To customize the chart, right-click the chart and click Properties. Using the Chart Properties
dialog box, you can configure and customize every aspect of the chart.
Whether you need to set the chart type and dataset name, configure
values for the x and y axes, or add visual effects, the Chart Properties dialog box is a one-stop shop for setting up a chart.
 [ http://msdn2.microsoft.com/en-us/library/aa964127.migrb36l(en-us,sql.90).gif ]
Figure 36. Default line chart type in SSRS (Click on the image for a larger picture)
Another
interesting point when migrating charts from a Crystal Report to SSRS
is how SSRS handles the rendering of multiple charts and aggregate. In
Crystal Reports, many report designers place charts and tables
containing aggregate data in the report footer, because the report must
read the detail data before it can report any aggregate data. This
constraint is a product of the multipass calculation engine in Crystal
Reports. SSRS, on the other hand, overcomes this constraint by
providing designers a free-form surface on which they can lay out their
reports any way that they want. This includes placing tables with
aggregates and side-by-side charts anywhere on a report.
Finally,
because SSRS is an extensible framework, you can purchase additional
charts, gauges, and diagram types from third-party vendors. One vendor
specializing in SSRS chart controls is Dundas [ http://www.dundas.com/ ] . To learn more about charts, visit the Working with Chart Data Region [ http://msdn2.microsoft.com/en-us/library/ms155847(sql.90).aspx ] topic in Books Online.
Multiple Data Sources and Subreports
Crystal
Reports and SSRS both have the ability to connect to a wide range of
data sources; however, using multiple data sources on a single report
in Crystal Reports has been known to cause performance issues. These
performance issues are a direct result of executing the
second/subsequent SQL queries for every row of data returned by the
primary SQL query. This could result in the launching of hundreds of
distinct queries. To work around this issue, Crystal Reports designers
use multiple subreports on a single master report to display data from
multiple data sources. SSRS, on the other hand, allows designers to
create multiple data sources in a report that can be used in different
data regions (controls), in a free form layout, to create the report
that they want to create, without having to look for obscure
workarounds or compromise the report's performance.
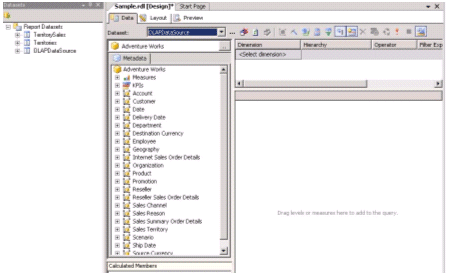
To
demonstrate how to connect to multiple data sources in SSRS, open the
tabular report created earlier to add a new dataset to the report.
Using the Dataset dialog box, you can create a new data source
to define a new connection. To follow this example, connect to
Microsoft SQL 2005 Analysis Services. You should now have three
datasets defined in the report. TerritorySales and Territory use the
AdventureWorks database, whereas OLAPDataSource uses the AdventureWorks
OLAP database (Figure 37).
 [ http://msdn2.microsoft.com/en-us/library/aa964127.migrb37l(en-us,sql.90).gif ]
Figure 37. Report sample with a heterogeneous data source in a single report (Click on the image for a larger picture)
In SSRS, a subreport
is a report item that references another report on the report server.
The referenced report can be a full report that can be viewed
independently, or it can be a report created specifically for embedding
in another report. When you define a subreport, you can also define
parameters to filter data in it. To add a subreport to your report, use
the Subreport control in the Toolbox. After placing the Subreport
control on the report, right-click the control to access its
properties. Here, you specify the referenced report and define the
parameters required for the subreport.
You may want to consider
using a data region instead of a subreport. Because the report server
processes each instance of a subreport as a separate report,
performance can be adversely impacted. Data regions provide much of the
same functionality and flexibility as subreports, but with better
performance.
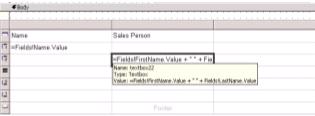
Linked Reports
When creating a link to another report in Crystal Reports, a designer must create an openDocument link on a particular field in a report in order to handle the report redirection. However, to use the openDocument function you must have Business Objects Enterprise installed, in order to get access to a report repository.
SSRS
offers the ability to link and pass parameters to other reports quite
easily, by setting the navigation property for a given object. You can
even link to reports located on other report servers, by using the URL
Access capabilities in SSRS, as explained later. To demonstrate the
navigation property of a textbox, the following example uses the Sales
Person column in the sample report to navigate to the Employee Sales
Summary report (one of the samples included with SSRS). First, access
the properties of the Sales Person textbox located in the second grouping of the table. Right-click this textbox, and then click Properties, as shown in Figure 38.
 [ http://msdn2.microsoft.com/en-us/library/aa964127.migrb38l(en-us,sql.90).gif ]
Figure 38. Accessing the properties of a textbox (Click on the image for a larger picture)
Click the Navigation tab of the Properties dialog box. In the Hyperlink section, select Jump To Report, and then select the target report in the drop-down list. To set the parameters to pass to the target report, click Parameters.
SSRS creates a list of parameters from the target report. You can then
associate static values or dataset values with selected parameters, as
shown in Figure 39.

Figure 39. Editing the Jump to Report parameters using static values and dataset field values
Click OK
until you return to the report designer. When you preview the report,
expand the territory grouping (Figure 40), and then hover the
cursor over the salesperson's name to see the pointer change to a hand.
 [ http://msdn2.microsoft.com/en-us/library/aa964127.migrb40l(en-us,sql.90).gif ]
Figure 40. Preview report-linking functionality (Click on the image for a larger picture)
Click a salesperson's name to navigate to the linked report using the parameters specified in the Jump To Report definition in the textbox properties (Figure 41).
 [ http://msdn2.microsoft.com/en-us/library/aa964127.migrb41l(en-us,sql.90).gif ]
Figure 41. Target Sales Person report from the Territory Sales report (Click on the image for a larger picture)
Use
the navigation bar at the top of the report (Figure 42) to browse
the current report, or to return to the parent report.
 [ http://msdn2.microsoft.com/en-us/library/aa964127.migrb42l(en-us,sql.90).gif ]
Figure 42. Linked report navigation bar (Click on the image for a larger picture)
URL Access
You
can also link reports in SSRS by using a report server URL. A URL
request enables you to access reports, resources, and other items on a
specific report server. Using URL access, you can also customize the
report viewing and navigation experience for your users. The query
string of the URL includes device information settings, as well as
report parameter values and a specific rendering format
(Figure 43). You can also use URL access to embed hyperlinks to
reports and other report server items in any Windows or Web
applications that you develop.
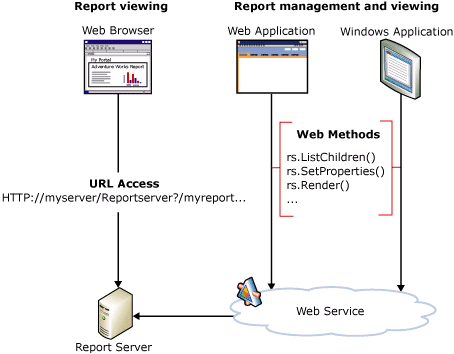
Figure 43. Available methods to communicate with a report server
For more information about linking reports in SSRS, visit the Adding Links to Reports [ http://msdn2.microsoft.com/en-us/library/ms159088(sql.90).aspx ] topic in Books Online.
Using Alternative Migration Techniques
SQL Server 2005 Reporting Services Report Wizard
As
with Reporting Services v1.0, SQL Server 2005 Reporting Services
includes a Report Wizard to help start report development. The Report
Wizard walks you through defining a data source, building a query,
selecting a report type, grouping report data, and selecting a style
for the report. To access the Report Wizard, right-click the Reports folder in the Solution Explorer of SQL Server Business Intelligence Development Studio, and then click Add New Report. For more information about the Report Wizard, visit the Creating a Report Using Report Wizard [ http://msdn2.microsoft.com/en-us/library/ms160326(sql.90).aspx ] topic in Books Online.
Third-Party Applications
When
migration efforts involve hundreds or thousands of reports, you may
want to consider automating as much of the migration process as
possible. Third-party service providers have recognized the need for
companies to accelerate the process of migrating to Reporting Services,
and they have developed applications and methods within a consulting
engagement that will allow companies to reach their goal faster. A
short list of some third party solutions include
Table 4. Third-party migration solutions
For more information, visit the Reporting Services Partner page [ http://www.microsoft.com/sql/reporting/partners/default.asp ] .
Conclusion
In
this paper, we explained various aspects of migrating from Crystal
Reports to SSRS. First, to help you decide whether to migrate, we
provided a high-level comparison between Crystal Reports and SSRS
features, along with an overview of some of the strategic benefits of
migrating from Crystal Reports to SSRS. Next, to help you prepare for
the migration, we described methods that you can use to analyze your
current reporting solution, identify consolidation and standardization
opportunities, and implement a phased migration. Next, to help you
perform the actual migration, we demonstrated a step-by-step migration
process that mapped each section of a sample Crystal Report with the
analogous SSRS section. Then, to help you see the range of capabilities
in SSRS, we discussed additional features such as matrices and charts.
Finally, to help you decrease the time required to migrate, we
explained how you can automate many of the steps of the migration. The
information and techniques presented here will make your migration
process easier and quicker.
For more information:
http://www.microsoft.com/technet/prodtechnol/sql/default.mspx [ http://www.microsoft.com/technet/prodtechnol/sql/default.mspx ]
Useful Links for SQL Server 2005 Reporting Services