Mark Robinson
August 2006
Applies to:
SQL Server 2005 Reporting Services
Navigation
Summary: This article presents an excerpt from the book,
Microsoft SQL Server 2005 Reporting Services for Dummies
[
http://www.dummies.com/wileycda/dummiestitle/productcd-076458913x,subcat-programming.html
] , by Mark Robinson. Learn how to produce interesting navigation and
drill down reporting using the basic tools provided within SQL Server
2005 Reporting Services. (17 printed pages)
Contents
Introduction
Drilling from Summary to Detail
Drilling Down and Pivoting on Detail Lines
Providing Multiple Drill-down Options
Providing Navigation Links to Reports
Handling Multiple Drill Paths
Preparing a Report Menu Page
Introduction
Remember
the good ol' Black and Decker tools? I remember that the Black and
Decker drill was an extremely popular market-leading drill allowing you
to drill through any type of surface. Every Dad wanted one for
Christmas.
In this chapter, I cover the drill-through aspects of
reporting. Everyone needs to drill deeper into the details of a report
to see what makes up its numbers. That's what I mean when I refer to
drilling through report information. I survey the techniques available
to you for drilling from one report into another from many different
perspectives using Microsoft Reporting Services. I also review several
scenarios in which you may want to consider drill-through reporting as
an innovative way to navigate information that is logically connected
but cannot be shown effectively in a single report.
In the
previous chapter, I say that you can use dynamic visibility to hide
detail until you want to see it in a single report. You also discovered
how to use document maps to navigate quickly within a single report to
get to more detailed information. This is really an interesting chapter
on further interactive reports that you can develop easily. In this
chapter, I cover how to drill down to other reports to get more
detailed views of more summary information from a starting report.
Armed with these valuable techniques, you will be able to amaze friends
and impress even the most skeptical in every crowd. These reporting
tricks are amazingly easy to set up and enable you to build more
complex reporting.
Drilling from Summary to Detail
A drill-through report
is a report that links itself to another report by passing parameter
values to the destination report. You activate the drill-through by
clicking a link within your report. Drill-through reports commonly
contain details about an item that you see in an initial summary report
(sometimes referred to as the source report of a drill-through). For
example, you may have a sales summary report with a list of orders and
sales totals. When a user clicks an order number in the summary list,
another report opens containing details about the order. The
drill-through report is the detail report containing details about the
order.
A destination of a drill-through report is a
parameter-based report, which receives its values from the summary
report. To use the same example as the previous paragraph, the
drill-through target report contains a parameter that takes an order ID
as a value. The summary report includes a drill-through report link for
each order number that opens the target detail report when clicked and
passes the order ID to it. Any report that you create can be a
drill-through report. You can add drill-through links only to textboxes
and images.
It doesn't always need to be tabular data from which
the drill-through report is linked. It may also be some graphical
report. To create a drill-through from a summary report to a detail
report, follow these steps:
- Create a summary report and a detail report.
For this example, I have created a pie chart showing the mix of
product category sales for a given year, called ChartCategorySales.
This will serve as the summary report. Then I created a detail report
that shows the product profitability for all products within a selected
ProductCategory. This report is built with a parameter of product
category. This detail report is named ProductProfit.
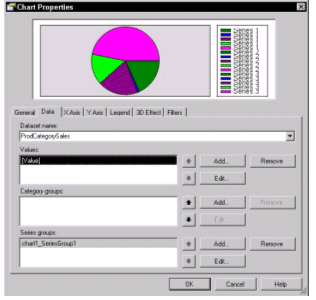
- Open the Chart Properties dialog box in the summary report.
For this example, I started with the summary report ChartCategorySales. Right-click the chart control and select Properties. The Chart Properties dialog box appears, as shown in Figure 16-1.
 [ http://msdn2.microsoft.com/en-us/library/aa964132.rsrptnvdrldn01l(en-us,sql.90).gif ]
Figure 16-1. The Chart Properties dialog box showing the properties of the ChartCategorySales pie chart
- Edit the action of the Values of the chart by clicking Edit in the Chart Properties dialog box. The Edit Chart Value dialog box appears.
- Click the Action tab.
- Specify the hyperlink action to be a jump to another report. To do this, select the Jump To radio button on the Action tab and select the detail report ProductProfit from the drop-down list.
Note The list of
report names includes all reports in the current report project. If the
drill-through report is on the report server but is not in the report
project, type the name of the report. The report name can contain a
relative or absolute path to the report.
- Specify the parameter you will pass to the next report by clicking the Parameter button in the Edit Chart Value dialog box.
The Parameters dialog box appears. For each parameter that
you need to pass, select it from the drop-down list of parameters
defined on the destination report within the Parameter Name column.
Then select or enter the expression for the data value from the current
report that will be passed when the chart is clicked.
In this example, you pass the category clicked on the pie chart
to the ProductProfit report—so in the Parameter Value column you want
to select the expression =Fields!Categoryvalue that corresponds to the dataset value that is charted in the ChartCategorySales report. This is shown in Figure 16-2.
Values can contain an expression that evaluates to a value to
pass to the report parameter. The expressions in the value list include
the field list for the current report.
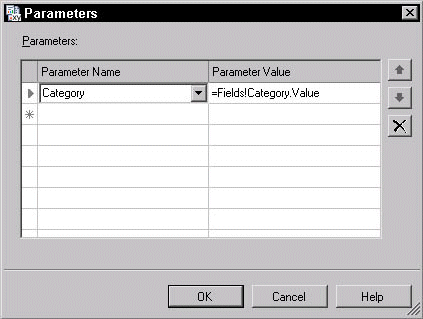
Figure
16-2. Parameters dialog box for specifying the parameters passed from
the summary report (ChartCategorySales) to the detail report
(ProductProfit)
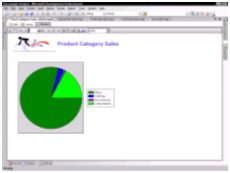
- Preview your summary report. The
preview of the ChartCategorySales report is shown in Figure 16-3. As
you can see, it is a pie chart showing the distribution of Product
Category sales for a calendar year.
 [ http://msdn2.microsoft.com/en-us/library/aa964132.rsrptnvdrldn03l(en-us,sql.90).gif ]
Figure 16-3. Preview of the ChartCategorySales report
- Test the drill-through capability. Click on the light green area corresponding to Components and, just as designed, the Components value is passed as a parameter to the ProductProfit report. The drill-through report is displayed.
Drilling Down and Pivoting on Detail Lines
Consider pivoting during a drill down. A pivot
involves drilling down first on one variable and then at that
drill-down level, drilling through on another variable. For example,
start at the top ten customer list and then drill to a particular
customer to see the products purchased by that customer. Then from that
view, drill down to see the history of product purchases for that
customer over the last two years. In that analysis, which begins with a
view of customers, drill down on products and then pivot on time.
Drilling down
usually refers to navigating a hierarchy of information. For example,
if you begin with Product Category, you can drill down to view the
Product Subcategories within the category and drill down further to see
the products within the subcategory. All of this can be done on the
same report (see Chapter 15 for an example). You would usually use the
terms link or drill across or pivot to describe
navigating to another report of the information along a different
variable. For example, if I drill down the product hierarchy and then
want to look at the regions in which the product is sold, this would
amount to a link or drill across or pivot along the territory variable.
This assumes that you have multiple variables along which you can
analyze the data. Some people refer to this drilling and pivoting as
slicing and dicing the data. Here the Vegematic analogy wins over the
Black and Decker drill analogy.
To create a drill and pivot
analysis, start from the Top 10 Customers report (TopTenCustomers),
then drill through to the Product Profitability report
(ProductProfitCustomer) filtered on the selected customer. Finally,
from this report, for a selected product line, drill through to the
Product Profile report (ProdProfileFilter). This destination report
will be filtered on the selected profit product.
Follow these steps:
- Modify
the top-level report to allow drill-through on the detail line. In this
example, I began with the Top Ten Customers report and set up the
drill-through. First, right-click on the cell containing the report
line description and click the Navigation tab. Then select the Jump to Report option and enter the report to which you want to drill through: the Product Profitability report or ProductProfitCustomer.
- Set up the parameter to be passed to the drill-through report. Still at the Navigation tab of the Textbox Properties dialog box, click the Parameters
button and specify the parameters required in the dialog box shown in
Figure 16-2. For each parameter, specify the data value in the summary
report that will be passed to the drill-through report.
I specified that the parameter reseller defined in
ProductProfitCustomer be supplied with the following value from the
current report:
=Fields!reseller.value
Note The number of parameters that display here correspond to the number of parameters on the drill-through report.
- Modify
the color and text decoration properties of the detail line to make it
appear as a hyperlink. To do this, select the cell with the detail line
description in the table and bring up the Properties window. Set the Color property to SlateBlue and the TextDecoration property to Underline. You can see this effect behind the dialog box in Figure 16-6.
- Modify
the drill-through report to enable another drill through to the Product
Profile report. To do this, right-click on the cell with the detail
line description in the ProductProfitCustomer report and select Properties. The Textbox Properties dialog box appears. Click the Advanced button in the Textbox Properties dialog box, which displays the Advanced Textbox Properties dialog box. Click the Navigation tab, select the Jump to Report
option, and enter the name of the report you want to drill through: the
Product Profile report or ProdProfileFilter. See Figure 16-4.
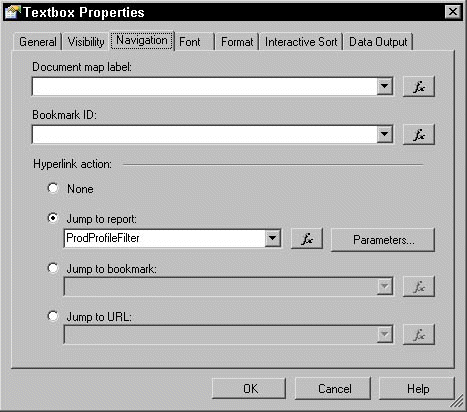
Figure 16-4. The Advanced Textbox Properties dialog box showing the setting to drill through to the ProdProfileFilter report
- Set up the parameter to be passed to the profile report. In the Advanced Textbox Properties dialog box, click the Parameters button to see the Parameters
dialog box, and then select each parameter from the drop-down list in
the Parameter Name column. Select the data value in the summary report
that will be passed to the drill-through report. I specified that the
parameter prod defined in ProdProfileFilter be supplied with the value
=Fields!Product.Value
from the current report. This is shown in Figure 16-5.
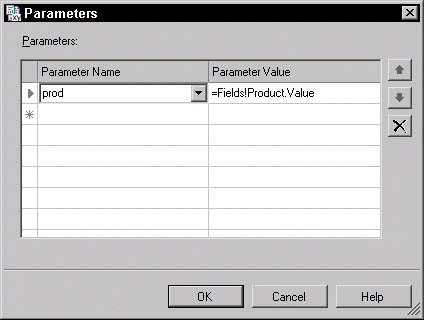
Figure
16-5. The Parameters dialog box corresponding to the parameter for the
Product Profile report, which is the result of the drill through from
Product Profitability report
Remember The
names in the parameter list must match the expected parameters in the
target report exactly. If the names do not match, or if an expected
parameter is not listed, the drill-through report fails.
- Modify
the color and text decoration properties of the detail line to make it
appear as a hyperlink. Select the cell with the detail line description
in the table and bring up the Properties window. Set the Color property to SlateBlue and the TextDecoration property to Underline. (See Figure 16-6.)
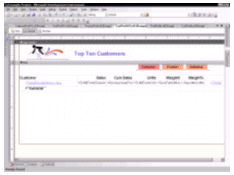
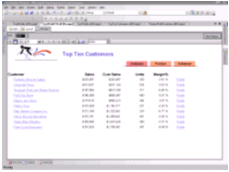
- Preview
your top-level report and test the drill-through capability you have
defined. The starting report in this scenario is the Top Ten Customers
report, very similar to Figure 16-8 later in this chapter. Note that
each Reseller in the first column of the report appears highlighted as
if it is a hyperlink on the Web. Click on any one of these resellers
and you will drill down to the Product Profitability report for the
clicked customer as shown in Figure 16-6.
 [ http://msdn2.microsoft.com/en-us/library/aa964132.rsrptnvdrldn06l(en-us,sql.90).gif ]
Figure 16-6. Second report in the drill-through scenario—Product Profitability featuring the customer parameter-based filter and hyperlinks for each product detail line
You
would then expand the product subcategory on this report (featuring the
dynamic visibility described in Chapter 15). The product detail lines
are then hyperlinked to the Product Profile report. Selecting any
product detail line in the report will bring up the Product Profile
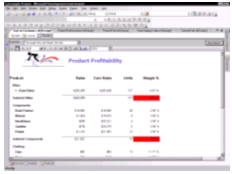
report for the clicked product, as shown in Figure 16-7.
 [ http://msdn2.microsoft.com/en-us/library/aa964132.rsrptnvdrldn07l(en-us,sql.90).gif ]
Figure 16-7. Third report in the drill-through scenario—Product Profile featuring the product parameter-based filter
In
the previous example, you can see two types of drill downs featured.
The first is the drill-through report for which you change the font to
look like a hyperlink to communicate to the user that a drill-down
capability is available. The second form of drill-down is the dynamic
visibility (described in Chapter 15), where you can expand the
subcategory level in the Product Profitability report to see the
underlying products purchased by the customer. Alternatively, a
document map (see Chapter 15) could be added for yet another drill-down
functionality in the Product Profitability report.
Providing Multiple Drill-down Options
Consider
the case of the Top Ten Customers report in the previous section. You
have allowed the user to drill down from any customer into the product
purchase history and then pivot to the product profile. What if you
wanted to begin at the Customer list and then go immediately to a
Customer Profile report? The Customer Profile report would show a
monthly history of product purchases for the last two years as well as
the last two years' distribution of product sales across product
categories.
In this situation, you need to enable the user to
drill down to product detail history as I describe in the previous
section. In addition, you need to provide a way to drill or link to the
customer profile for any customer selected. One of the ways to enable
this is to provide yet another link on each report detail line to allow
a jump to the customer profile, passing the customer selected as a
parameter.
In order to avoid cluttering the report detail too
much, I have elected to put this second link in the last column of the
Top Ten Customer report. I used the following steps to create the
desired effect:
- Add a column to the Report Detail line in the
source report. I simply add a column to the right of the last column of
the table control in the Top Ten Customers report.
- Add an
expression that will tell the user what the link will be. In the cell
in the detail row in this column, I add the expression:
="Profile"
This indicates that the link will navigate to the Customer Profile report.
- Format the link to make it appear as a hyperlink. To do
this, select the cell with the detail line description in the table and
bring up the Properties window. Set the Color property to SlateBlue and the TextDecoration property to Underline. If you preview this report, it should look like Figure 16-8.
 [ http://msdn2.microsoft.com/en-us/library/aa964132.rsrptnvdrldn08l(en-us,sql.90).gif ]
Figure 16-8. Preview of the Top Ten Customers report showing hyperlinks to drill down by customer or pivot to a Customer Profile
- Modify
the source report to enable another drill-through to the profile
report. To do this, right-click on the cell with the detail line
description in the TopTenCustomer report and select Properties from the list that appears. This will display the Textbox Properties dialog box. Click the Advanced button in the Textbox Properties dialog box, which displays the Advanced Textbox Properties dialog box. Click the Navigation tab and click the Jump to Report option and enter the report to which you want to drill—the Customer Profile report or CustProfile.
- Set up the parameter to be passed to the Customer Profile report. Still at the Advanced Textbox Properties dialog box, click the Parameters button to see the Parameters
dialog box. Now select each parameter from the drop-down list in the
Parameter Name column. Then select the data value in the summary report
that will be passed to the drill-through report. I specified that the
parameter cust defined in CustProfile be supplied with the following
value from the current report:
=Fields!ResellerName.Value
- Preview your top-level report and test the
drill-through capability you have defined. The starting report in this
scenario is the Top Ten Customers report shown in Figure 16-8. Note
that the Profile hyperlink appears on each report detail line. Click on
the Profile link for any customer and you will navigate to the Customer
Profile report shown in Figure 6-9 for the selected customer.
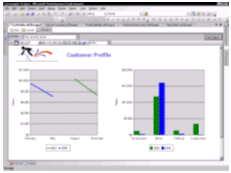 [ http://msdn2.microsoft.com/en-us/library/aa964132.rsrptnvdrldn09l(en-us,sql.90).gif ]
16-9. Preview of the Customer Profile report after you click the Profile link
You
can use other techniques to link to other reports. You can use images
and textboxes as well as cells in a table or matrix because all of
these controls support a Navigation tab that permits you to use these
controls (or their cells) to navigate to other reports. Even a chart
control enables you to define an action on each graphic element being
rendered. For the chart control, you need to open its Property page and
click on the Data tab and edit one of the values. This brings up the Edit Chart Value
dialog box on which you can select the action tab, which presents the
hyperlink actions such as jumping to reports, URLs, or bookmarks.
Providing Navigation Links to Reports
Suppose
you want to design reports for instances when you start at one group of
reports that represents the top of a pyramid of reports. As an example,
you may have a set of top ten reports from which you can start an
analysis. From any of these top ten reports, you want to be able to
quickly navigate to the other one to determine how you may want to
begin your drill-down analysis.
This situation is an example of
monitoring information from several standard viewpoints with a need to
move quickly between these unique viewpoints. When something in the
report provokes further exploration, a drill-down analysis can begin
with the drill-through links in each report.
You must
accommodate multiple navigation links in each of the top ten reports.
You can enable these links by using images to represent links to other
reports. If you are not graphically adept (like me), you can use the
low-tech approach of making a textbox resemble an image and setting the
navigation properties of the textbox to do your work.
I use an
example of leveraging Top Ten Customers, Top Ten Products, and Top Ten
Salesmen as the high-level reports at the top of the pyramid. Each
report will have three buttons (which will be produced with textboxes)
to navigate to any of the other reports in this group. So I need three
buttons: Customers, Products, and Salesman. I will show all three
buttons when we view each of the reports. To make it interesting, I'll
change the BackgroundColor of the textboxes to show one color
when the link corresponds to the current report (so clicking it would
not navigate anywhere else) and another color when the link will take
you to another report.
Follow these steps to make it happen:
- Place and format the navigation buttons on each
report. Begin with the Top Ten Customers report. Figure 16-10 shows how
I placed and formatted the textboxes and where I placed them on the
report. I set the BackgroundColor of the textbox to LightCoral if the link is for the current report and to LightSalmon if the link can be taken to the other reports. I personally like pastel colors, but you can be as bold as you want.
Note Because you
cannot use fields in report headers or footers, buttons used for
linking need to be placed in the body of the report.
 [ http://msdn2.microsoft.com/en-us/library/aa964132.rsrptnvdrldn10l(en-us,sql.90).gif ]
Figure 16-10. Layout view of the Top Ten Customers report showing the new navigation buttons
- Set
the navigation properties for each of the buttons on each report. To
navigate to the Top Ten Products report, set the navigation properties
for the Product button. Right-click the textbox and select Properties to bring up the Textbox Properties dialog box. On the Navigation
tab, you specify that you want to jump to a report called ProdProfit10
and then select the parameter you need to pass. For all the top ten
reports, we are using CalendarYear as a parameter to filter the report for the current year only.
Tip For the sake
of review, in order to filter effectively to construct the top ten list
style of report, all you need to do beyond constructing the basic
report table (or matrix or list) is add the following filter to the
detail line group:
Operator --> 'Top N'
Value --> '=10'
For
the grand finale, the report flow from this example reporting scenario
is illustrated in the following figures. I begin with a logical
starting point of the Top Ten Customers (see Figure 16-11).
 [ http://msdn2.microsoft.com/en-us/library/aa964132.rsrptnvdrldn11l(en-us,sql.90).gif ]
Figure 16-11. Preview of the Top Ten Customers report showing the navigation hyperlinks and buttons
- Click the Products
button to navigate to the Top Ten Products report. Note that the
Products button has a different background color than the others
because this is the current focus of the navigation options.
- Then click the Salesman button to navigate to the Top Ten Salesman report.
By
clicking the Profile hyperlink on any of the previous reports, you can
navigate to the Product Profile report passing the parameter of the
current year. This is shown in Figure 16-12. This is merely an
illustration of what you can set up for navigating between reports and
the parameter passing you would like to implement.
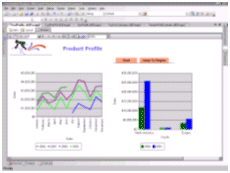 [ http://msdn2.microsoft.com/en-us/library/aa964132.rsrptnvdrldn12l(en-us,sql.90).gif ]
Figure 16-12. Preview of the Product Profile report with the year parameter passed from any of the top ten reports
Handling Multiple Drill Paths
Consider
another interesting case of drilling through to other reports. Suppose
you want to design for the case that you have many different drill
paths for investigating information more deeply. For example, starting
at the Top Ten Products report, you may want to drill down to see a
different report perspective where you see a selected product sales by
customer or a selected product sales by region. You would like to make
this decision while you are viewing the Top Ten Products report and
click a hyperlink to quickly see the desired perspective.
This
is where your creativity comes into play. You know how Reporting
Services helps you create drill-through reports. You also know how to
present navigation links as hyperlinks to the user. You now need to
consider how to fit these options into the screen real estate of a
report to provide some dynamic analyses at the click of a mouse.
Here's
one way to do this. Consider that the image control also permits you to
set up navigation to another report while passing the necessary
parameters. Images take up less real estate than textboxes (unless the
textboxes have a very small font). Pictures speak a thousand words, so
you can indicate options with a picture that you teach your users to
use. Using images, however, requires some graphics skills—unless you
can borrow from some clip art and have common pictures tell your
navigation option story to your users.
Now the question of where
to place the images. I am going to be so bold as to suggest that you
place the navigation options to the left of the detail report line
descriptions. I want to place them in the detail if I am passing the
detail description (in this case, product) to the drill-through report.
If I am only interested in doing this analysis at a subtotal level, I
can provide these options only at the subtotal line. So in the table
control, you need to insert a column to the left of the Product heading
column and then place an image control in the corresponding detail
cell, as shown in Figure 16-13. Here I have added two options: one for
the Drill Down by Customer option represented by the little headlike
icon, and the other for the Drill Down by Area option represented by
the textbox caption Area with an 8-point Arial font.
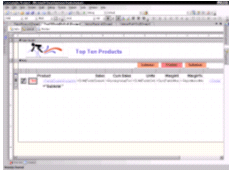 [ http://msdn2.microsoft.com/en-us/library/aa964132.rsrptnvdrldn13l(en-us,sql.90).gif ]
Figure
16-13. Layout of the Top Ten Products report with two additional
drill-by options to the left of the Product column heading
The
preview of this revised Top Ten Products list is shown in Figure 16-14.
Note that I have seven different navigation options on this single
report. I have the three navigation options at the top ten level
represented by the navigation buttons above the report and then four
types of navigation from any product of interest in the report body.
This has now become an interesting reporting scenario for the user.
 [ http://msdn2.microsoft.com/en-us/library/aa964132.rsrptnvdrldn14l(en-us,sql.90).gif ]
Figure 16-14. Preview of the Top Ten Products report with the seven navigation options
Preparing a Report Menu Page
Most
business users like to see a set of options to select from in
determining where to begin their investigation or what report they
would like to see. This main menu approach can also serve as a way to
organize the collection of reports available to you.
You have a
lot of flexibility through the use of textboxes, images, lines,
rectangles, and other controls of the types of reports you can build.
You don't even need a dataset to source from if you don't need it. Some
designers develop a table of reports available to a given user. You can
create a dataset to query that table and present it to the user as a
list or table of reports. If you had the URL of the report you would
like to render stored in this table, that could be a field in your
dataset you can reference in the Jump to URL navigation option. But
that requires some planning and perhaps a DBA to set up and maintain
the tables.
The low-tech way to set up a report menu as a report
is to add textboxes in a report that requires no dataset and set the
navigation properties and parameters values (if any) for each textbox.
Adding other images and a company logo can spice up the report menu
page. I put in a graphic at the base of the report to give it a more
polished look.
When I preview this report, I see what is shown in Figure 16-15—a respectable starting point for my key reports.
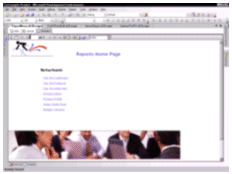 [ http://msdn2.microsoft.com/en-us/library/aa964132.rsrptnvdrldn15l(en-us,sql.90).gif ]
Figure 16-15. Preview of the report menu with links to my key reports